A very simple and perfect guide to adding google analytics to WordPress website.
We all know that Google Analytics is the best platform to track your website traffic and it gives you useful insights about your visitors.
How to add Google Analytics to WordPress website without any plugin
I personally recommend that use minimum plugins in your WordPress website. Do not add plugins for every single task. Why you should not use many plugins in your WordPress website.
Table of content
- Signup or login to Google Analytics
- Copy the tracking code
- Paste code into your wordpress website
- Verify if tracking code added properly
- Verify if tracking code is recoding in Google Analytics
1. Signup or login to Google Analytics
Go to Google Analytics and log in to your account or register if you are using it for the first time. Once you are in Google Analytics you need to click on the Admin section in the left bottom menu. A page will open look like the below attachment.
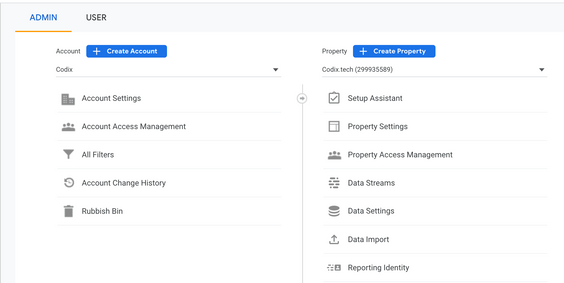
There you need to click on Create Account and set up your analytics for your website.
Step 1 (Account Setup): Give a name to this account, for example – MyWebsite.com Analytics
Step 2 (property Setup): Give a property name, for example – My Website Analytics. Select your country and timezone.
Step 3 (About your business): Add information about your business and click on Create button.
2. Copy the tracking code
Once you have done Step 1 you will the above screen where you can navigate to Tracking Code under the Property column.
It will open a new slide where you will see a Global Site Tag code. There you see some code that you can copy. This code looks like the below screenshot.
3. Paste code into your wordpress website
This tracking code you need to add to your website before closing the head tag. There are multiple ways to add these codes to your WordPress website. You can use the easiest way, only you need to know that this code must be inserted in the head tag.
Here I share 3 simple ways that you can use –
- Manually add in your theme’s header.php file
- In your theme ot page builder plugin built header code feature
- Using a plugin
The first option is not beginner-friendly and another disadvantage is this code will remove when you will change the theme or update it to the next version. I only recommend the first option if you are a developer and use a child theme for your website.
Child theme does not update when you update your main theme, so you are good to use this method, but again if you want to change your website theme, it will not work.
Many themes offer a built header code feature where you can insert your tracking code. But this second option will not work if you change your theme to another one in the future. You need to again insert your tracking code.
There are some page builders like Elementor, Divi, Fusion Builder, and so on. They have a feature to add code in your header, you can also use that one if you are using these page builders for your website.
Last but not least, using a plugin called Insert Headers and Footers plugin allows you to add your tracking code easily in your website header.
4. Verify if tracking code added properly
Once you have added your tracking code first you must verify if you have added it in the proper place. Navigate to your website and right-click anywhere. Click on the view page sources link, it will open a new page in a new tab where you can see many codes.
In these codes, you need to search your Tracking code and that code must be before closing the head tag.

5. Verify if tracking code is recoding in Google Analytics
This is your final verification and a test to check that your tracking code is recording. Go to the Google Analytics Home page and check if you can see active users on your website. If you see active users in the analytics means you are good to go.
There is also another option to verify is load a URL of your website with /?utm_source=analytics_test&utm_medium=referral and check your analytics. Go to Real-Time > Traffic Sources. If you see analytics_test in the referral list means you are good to go.
Do you still have any problems and want to consult about your issues, you can contact me, I will help you as soon as I can.