This guide will help you to add Address Autocomplete in the WordPress website. I will guide you on how to enable this feature in your WordPress website in just 2 steps.
I am sure this address autocomplete guide works for any WordPress form but in case it does not work for you, please don’t worry. At the end of this article, I am adding my contact URL you can leave me your message, I will help you.
Address Autocomplete guid in just 2 simple steps that works 100% for every form
Here are the steps below if you want to jump directly on a step
- Get your Google Places API key
- Add your Google Places API key in WordPress
Step 1 – Get your Google Places API key
You need a google places API key that allows your website an autocomplete address authentication. You can generate it from Google Developer Console.
Generate your Google Places API key from Google Developer Console –
Go to the Google Developer Console and select your already created project or you can create a new project.

Or you can create a new project –

Once you have created your project select it from the dropdown menu. You will see the below screen where you need to enable 3 APIs and Services.

When you click Enable APIS and services, it will open a new page where you see the google API library.

Here you need to enable the APIS mentioned below.
- Geocoding API
- Maps JavaScript API
- Places API
To enable these APIS you can type its name in the search box and click on ENABLE button.
Once you have enabled these APIs go back to the Google Console Dashboard and navigate to Credentials. There you need to click on Create Credentials button. It will open a dropdown menu where you need to click on the API key.
Check the below image where I have mentioned the 1, 2, 3 clicks you need to make.

When you click on the API key it will open a dialog box where you can see your generated API key. There you need to restrict your API by clicking on the Restrict key button.

A new page will open where you need to configure some settings. Here I am again attaching screenshots that will help you to do it correctly.
- Application Restrictions – You need to select HTTP referrers(websites) option here. Google console allows you to select one application restriction per key.

- Website restrictions – Once you select HTTP referrers, a website restricions option will appear below that, where you need to enter your website address.

- API restrictions – Now you need to restrict 3 APIs that you were enabled earlier. To do that select Restrict key and click on the dropdown that appears below, where you can select Geocoding API, Maps JavaScript API, and Places API.

Once you have done click on the Save button at the end of the page. You will redirect to the credentials page where you can see your API key.

This was your step 1 you just completed, now I will guide you to step 2.
How to autocomplete address in WordPress
In step 1 we haven’t touched the WordPress dashboard and generated the Google Place API key. In step 2 you need to log in to your WordPress dashboard.
I know you are using some WordPress From Plugins like WPFroms, Gravity Form, Contact Form 7, or something else.
This guide works for every plugin, free or paid. Even if you are using any custom from it works perfectly.
Step 2 – Add your Google Places API key in WordPress
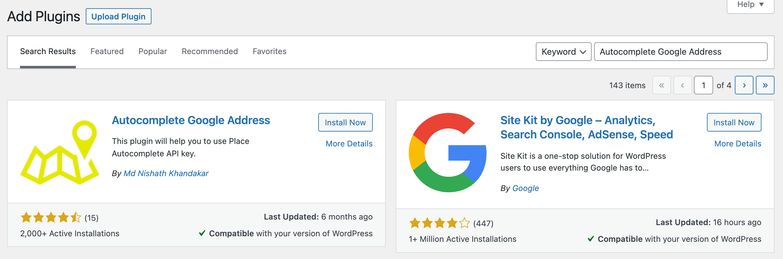
Install Autocomplete Google Address plugin in your WordPress dashboard from plugins. Click on add new plugin and search Autocomplete Google Address, Install and activate this plugin.
Once you installed and activate this plugin it will appear in your dashboard left menu where you can navigate this plugin’s settings page.
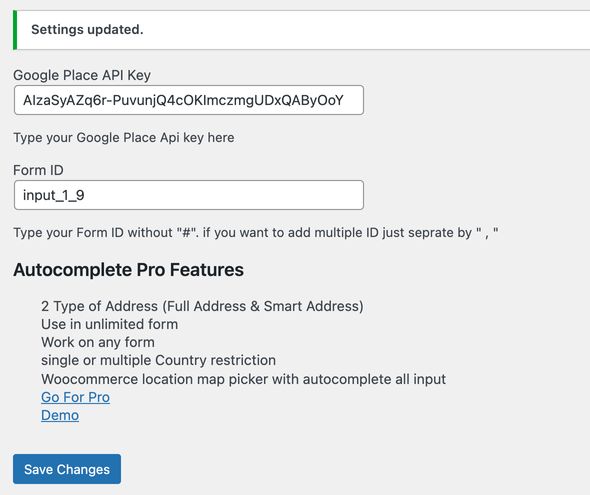
Paste your Google Places API key which you have generated in step 1 and paste your form’s address field id. Don’t forget to save your changes.
How to get Form ID?
Technically this is not the form ID but the ID of the address field in a form, where you want to add address autofill. Don’t need to confuse here. I will help you to find this ID properly. You need to go to the website page where your form appears.
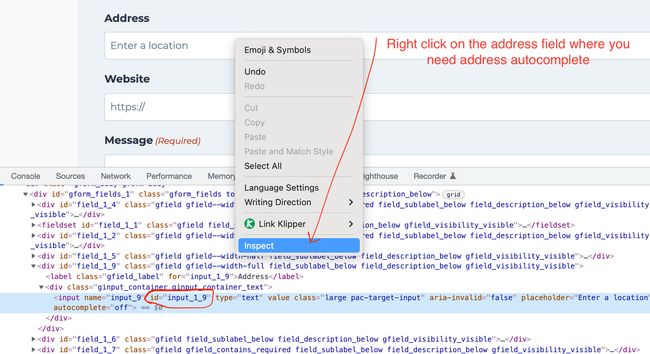
Like in the above image, right-click on the form’s field where you want to enable address autocomplete and click on the inspect. It will open the source code of the page where the field’s codes will be highlighted. Here you can copy the ID and paste it into the plugin. It does look like something
<input name="input_9" id="input_1_9" type="text" value placeholder="Enter a location">Refresh the page where your form is appearing, and try to type something in the address field, you will see the address shown below in a dropdown list.

Congratulation you have just added the address autofill in your WordPress form.
Wrap of how to add autocomplet address in wordpress
WordPress is a popular CRM and is used by many businesses. Enabling the address to autocomplete in a WordPress form is very simple as I have described in the details. It is required a Google Places API key which you can generate from Google Developer Console. This API key you need to add to your WordPress website which you can add using a plugin called Autocomplete Google Address. Now you need to configure the form field where you want to add autocomplete address feature which you can find by inspecting that field. Now you need to add this id in Autocomplete google address plugin as I have shown you in the screenshots above.
I hope my guide helps you to enable autocomplete addresses in your WordPress website. As I have promised in the starting if somehow it does not work for your form please feel free to contact me.
Please share my article to help others and comments below for any question related to WordPress address autocomplete.